 Austin loves to move, and he loves to be on his stomach. Even when I try to prop him on his side, if he is not wedged into position and has an incentive like something he wants to see, he will eventually start corkscrewing his head and body around to try to get onto his stomach. It takes a while, but he can do it. He just rocks his head back and forth until his body falls in line.
However, because he has a big ol' heavy noggin caused by his Dandy Walker malformation (which resulted in hydrocephalus), he cannot lift his head off the floor when on his stomach so he ends up causing a "rug" burn on his nose and cheeks and even nose bleeds as he repeatedly rocks his head side to side. This happens on every surface we have tried - blankets, gym mats, bed chucks, etc.
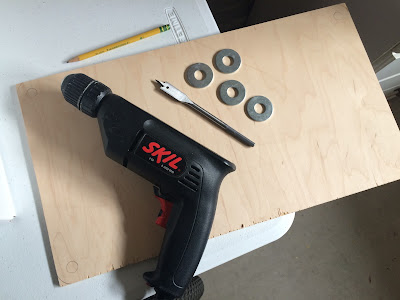
Collect The Materials


Step 8:
Find your drill and a drill bit that will just fit inside the hole in the washer. Search everywhere for these drill bits because you know you bought them once, and they have to be around somewhere. Find them in a drawer you had already checked three times.


Step 19:
Cut the corners off the foam using that bread knife again. A bread knife goes through foam like butter on a pot roast.


Step 24:
Take another picture and wish you were done. Think to yourself that this is taking way too long. Keep adding steps because you have more pictures.


So this weekend after watching this happen - A G A I N, I finally decided to try to build him a solution I had been mulling over in my mind for a while. I wanted to build a little platform that would raise his body between his armpits and his waist off the floor 2-3 inches so that only his forehead and knees would be against the floor and maybe his nose and cheeks could get a break.
I've tried pillows and stationary platforms before, but he eventually rolls off them and back onto his face (or, if you can believe it, has even propelled himself over them). So I was also thinking that if the platform was suspended like a swing, then he could benefit from the movement and feel like he was pushing himself with his legs. And who knows, maybe by some miracle, he might even discover that he has arms while they dangle beneath him onto the floor.
Therefore, this is my step by step photo tutorial with instructions of how I built Austin's little platform swing.
Collect The Materials
Step 1:
Raid your dad's scrap wood bin. First you need a dad who does random furniture repair and refinishing projects and then hoards the scraps. Make sure he pulls out lots of options, and that he almost falls into the bin while searching for just the right piece. It needs to be light weight and to your exact specifications, 10" x 18" (the 10" was the approximate distance from armpits to waist and the 18" was arbitrary).
Step 2:
If the piece of wood that he gives you is the right weight/thickness, but not the right measurement, have your dad pull out his new compound sliding miter saw woodworking toy that he bought a couple weeks ago (after much research he says) so he can see if it will work on a project like this. It works beautifully. Watch him be excited about this.

Step 3:
Casually mention to your dad that you plan on covering the wood piece with some kind of cushion material and then another material that would be easy to clean. Stand back while he miraculously digs out scraps of 2" foam and leftover faux leather.
Step 4:
Tell him you were thinking of using eyebolts in the corners to loop rope through so you can hang the swing. Let him dig through his hardware hoard to only come up with one eye bolt. Let him think you are going to the store for the hardware, and then let your eyes glaze over as he describes how you need a nut and then a flat washer, and then the bolt goes through the wood, and then you need another flat washer and a locking washer and then another nut. Think to yourself that going to the store for all those parts sounds like too much trouble and will delay the project. Determine you will find something that will work in your own hoard at home. Thank your dad and grab your stash.
Step 5:
At home decide that you will just drill a hole in each corner, feed the rope through and tie a knot underneath. Then be concerned that the light weight piece of wood you chose might be too thin and might break from the strain of the rope in the corner. Try to think of something that could reinforce the corners. Brilliantly remember that you might have some large washers leftover from a DIY decoupage necklace project you were all excited to make once so you had bought like ten washers. You only made five necklaces. You rummage through your sewing table and score four large washers with holes in the center big enough for some rope.
Step 6:
Find some rope. Go into your garage and let your eyes wander the shelves. Spy the abandoned climbing rope that you found tied to a tree at a campground in Yellowstone National Park. The rope is being stored with your camping and G.O.O.D. supplies, but now you decide a swing for Austin is way more important than that chance apocalypse (be concerned for a moment that in the light of world events you could be wrong, but dismiss this idea quickly because it's depressing). Focus on the now.
Assemble The Swing
Step 7:
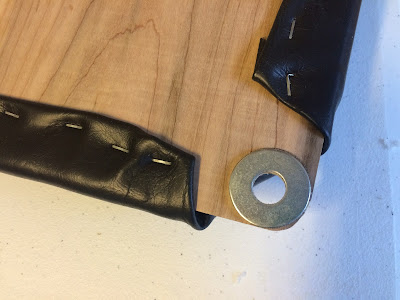
Take the large washers and decide you might want to glue them in place at each corner so they don't slide around when you add the rope. Before you glue them, realize you should probably drill the hole first in case you don't have good aim and then glue the washer over the hole you create. Take a pencil and mark the inside and outside of the washers on the corners on the top of the board.

Find your drill and a drill bit that will just fit inside the hole in the washer. Search everywhere for these drill bits because you know you bought them once, and they have to be around somewhere. Find them in a drawer you had already checked three times.

Step 9:
Realize the drill bit is going to go sliding all over the place unless you take a hammer and nail and make a tiny hole to get the drill bit started.

Step 10:
Be really tentative when you start drilling the first hole because you are worried you are going to split the wood. This causes you to not give the drill enough RPMs so that you end up NOT drilling all the way through the wood making the hole start shredding on the backside when you try to finish it. On the next three holes figure you can't screw up any worse and confidently pull the trigger back and shove that drill through each hole making nice clean shapes. Begin to sweat a little.

Step 11:
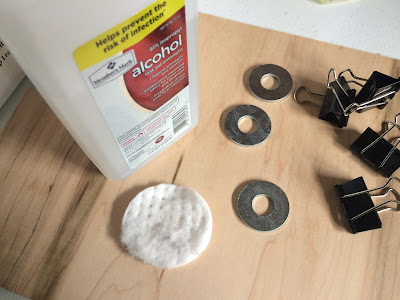
Find some glue. Dig around in your junk drawer in the kitchen and find some kind of all purpose glue that you bought for another project and never used. Be only a little concerned that you have no idea if it will hold or not. Find some bull dog clips in another kitchen junk drawer to hold the washers in place after gluing since it says on the bottle it's going to take 30 minutes to set and 24 hours to cure. Ignore the 24 hour part.

Step 12:
Since you have no idea how dirty or slimy your washers are, go ahead and clean them with a cotton pad and some alcohol. Do this only because it makes you feel like a professional and not because you know if you have to or not. Hope the glue sticks.

Step 13:
Flip your piece of wood over and squeeze a bead of glue around what looks like the bottom of the washer. Stand back and photograph the glue bead because you can.

Step 14:
Glue a washer on each corner of the board securing it with a bull dog clip to keep it in place. You now realize you are at a stopping point because you have to wait 30 minutes for the glue to set. This will be the hardest part of the project because you might easily become distracted by something else and never come back to finish. It's the risk you take with every project you start.

Step 15:
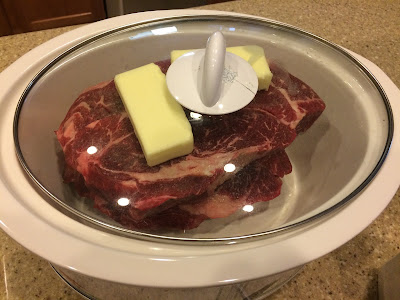
Go to the kitchen and realize the pot roast you put in the slow cooker that morning is done! Get a little excited because you are hun-gry.

Step 16:
Lift the lid and break the handle off (again). Remove pot roast to rest in a casserole dish while you make a little gravy. Eat said pot roast while watching a DVR'd Real Housewives episode. Ignore future judgements from readers that you did not fix and are not eating any vegetables or salad. Ignore future judgements from readers that you are watching Housewives.

Step 17:
Hoist your butt off the couch because you are losing the daylight you need to finish the project. Everyone knows that daylight makes the photos look better. Go out to the garage and remove the bull dog clips. Bring the board inside. Admire your work. Resist urge to quit.

Step 18:
Cut the piece of 2" foam using a bread knife (see knife in Step 19) so that it is about an inch or so larger than the board. Plan to cut the corners off the foam to allow for the holes in the board to be accessed by the rope. You are not quite sure what the plan is at this point. Keep going anyway.

Cut the corners off the foam using that bread knife again. A bread knife goes through foam like butter on a pot roast.

Step 20:
Cut that free faux leather scrap that your dad gave you a couple inches or so larger than the foam. Try to think of something clever to write here. You can't so move on.

Step 21:
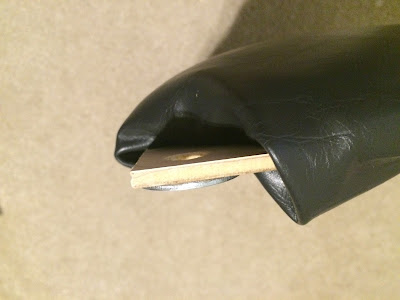
Begin upholstering the board by putting all your weight on it with your knees and pulling the fabric tight over the foam. Attach with a staple gun like a boss and like you've done this before. Channel all the DIY episodes you have ever watched to get this done. This is harder work than you thought it would be, and your under-knees start sweating. Consider if it would be weird to put antiperspirant on the skin behind your knees. Fold the fabric under before stapling for a clean edge since you are too lazy to upholster the bottom of the board. Realize the corners will have too much fabric when you start folding it under so cut off each corner to reduce the bulk.

Step 22:
Play with the corners to get the folding to work and to avoid covering the hole for the rope. Tuck the fabric under the foam on the top and then pull tight to the back and staple. Keep sweating.

Step 23:
Take a picture so that you have an excuse to take breather break then finish the rest of the corners.

Take another picture and wish you were done. Think to yourself that this is taking way too long. Keep adding steps because you have more pictures.

Step 25:
Decide you should probably cut the sharp corners off just in case the swing tries to bash your kid in the eye. Your are not saying you know HOW this would happen, but you ASSUME this will happen and as a mom your are always worried about sharp corners.

Step 26:
Find your Dremel Christmas gift from years ago and spend a while trying to remember how to put the sanding bit on.

Step 27:
Use the Dremel to round the corners smooth up against the washer. Be impressed that the washers haven't fallen off yet and the glue is still holding.

Step 28:
Stand back and take in your finished platform and celebrate that you are in the home stretch.

Step 29:
Measure, cut, and thread the climbing rope to the appropriate height for your kid. Get distracted by the Shahs of Sunset all wearing white and screaming and throwing red cake on each other while on a yacht. Forget to take pictures of adding the rope. Figure if anyone actually reads this, they will just have to figure it out by trial and error like you did.

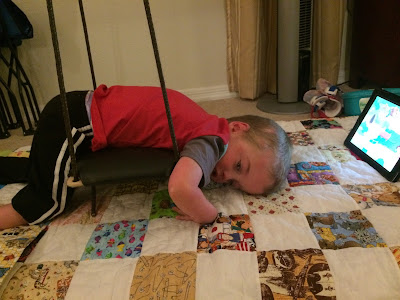
Step 30:
Drape your child onto the swing letting his forehead and knees rest on the floor. Be impressed with yourself because it looks like it's going to work. Smile when he starts getting excited and kicking his legs and swishing his arms and rocking his head back and forth.

Step 31:
Pat yourself on the back when his nose and cheeks clear the floor and don't rub it.

Step 32:
Add a disclaimer that the child should not be left alone while in this contraption and should be supervised by an adult at all times. Like duh.

Step 33:
Since you are so accomplished with your latest project, feel confident that you can do anything. After your child is in bed, go back to the kitchen and decide you are going to fix the handle on the crock pot lid. Begin trying to remove the bolt and nut that you had tried to epoxy a couple months before with a utility knife. Listen to the glass pop loudly as it shatters beneath your hands. Freak out for a moment until you realize all the glass is still right in front of you and not in your eyes.
Since you are so accomplished with your latest project, feel confident that you can do anything. After your child is in bed, go back to the kitchen and decide you are going to fix the handle on the crock pot lid. Begin trying to remove the bolt and nut that you had tried to epoxy a couple months before with a utility knife. Listen to the glass pop loudly as it shatters beneath your hands. Freak out for a moment until you realize all the glass is still right in front of you and not in your eyes.

Step 34:
Go to bed and count your blessings.